In the rapidly evolving world of cryptocurrency and blockchain technology, non-fungible tokens (NFTs) have gained immense popularity. NFTs are unique digital assets that represent ownership of specific items or pieces of content on the blockchain. MetaMask, a widely used cryptocurrency wallet and gateway to decentralized applications allows users to manage their Ethereum-based assets, including NFTs. In this guide, we will walk you through the process of importing NFTs to MetaMask, enabling you to easily manage and showcase your valuable digital collectibles.
Understanding import NFTs to Metamask
Non-fungible tokens (NFTs) have revolutionized the concept of ownership in the digital realm. Unlike cryptocurrencies such as Bitcoin or Ethereum, NFTs are indivisible and represent ownership of unique items, such as digital art, music, virtual real estate, and more. MetaMask serves as a bridge between users and the decentralized web, allowing them to access and interact with various blockchain-based applications, including NFT marketplaces.
Setting Up Your MetaMask Wallet
If you don’t already have MetaMask installed, you can easily download and set it up as a browser extension or mobile app. Follow the instructions provided by MetaMask to create a new wallet, secure it with a strong password, and back up your recovery seed phrase in a safe place.
Finding Your NFTs
Before importing NFTs to MetaMask, you need to locate the NFTs you own. NFTs are usually associated with Ethereum addresses. Visit the NFT marketplace or platform where you acquired your NFTs and log in with the Ethereum address linked to your MetaMask wallet.
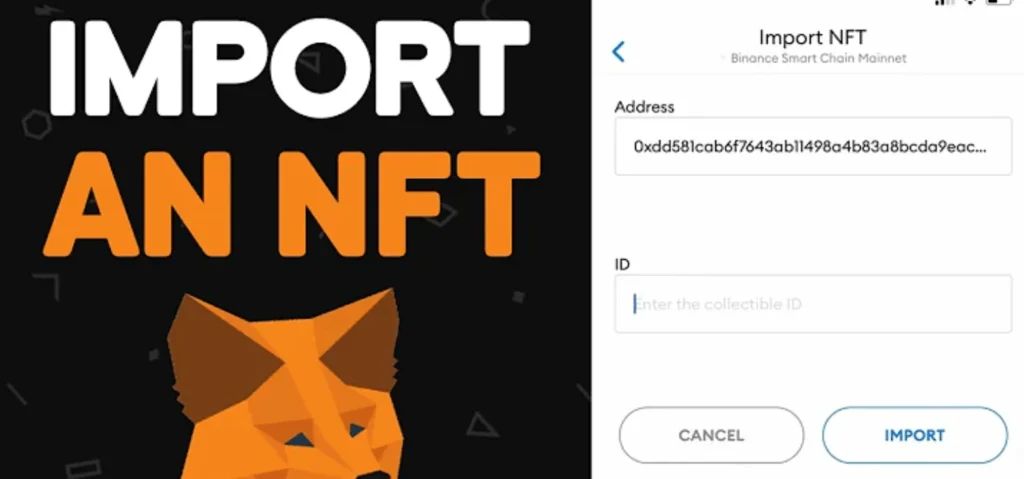
Importing NFTs to MetaMask
- Open MetaMask: Log in to your MetaMask wallet.
- Access Settings: Click on the account icon and navigate to “Settings.”
- Networks: Select the appropriate Ethereum network (Mainnet or Testnet) based on where you acquired your NFTs.
- Add Token: Scroll down to the “Assets” section and click “Add Token.”
- Custom Token: Choose “Custom Token” and enter the contract address of the NFT.
- Token Details: MetaMask will automatically fill in the token’s name and symbol. Click “Next.”
- Complete Addition: Click “Add Tokens” to finalize the process.
Viewing and Managing Imported NFTs
Once you’ve successfully imported your NFTs, you can view and manage them in your MetaMask wallet. Each NFT will appear as a unique item in your wallet, complete with its image and relevant information.
Tips for Ensuring NFT Security
- Keep your MetaMask wallet and computer secure with strong passwords and two-factor authentication.
- Store your recovery seed phrase offline in a secure location.
- Be cautious of phishing attempts and only connect your wallet to reputable platforms.
Troubleshooting Common Issues
If you encounter issues importing NFTs, double-check the contract address and ensure you’re connected to the correct Ethereum network. If problems persist, seek help from the MetaMask support community.
Showcasing Your NFT Collection
MetaMask allows you to showcase your NFT collection by connecting your wallet to platforms that display your NFTs to other users and collectors. This provides an opportunity to share your unique digital assets with the world.
The Future of NFTs and MetaMask
As the NFT space continues to expand, MetaMask is likely to integrate more features to enhance the NFT experience for its users. This may include improved visualization, increased security measures, and seamless integration with new NFT marketplaces.
Read also: What is an NFT community
Conclusion
Importing NFTs to MetaMask empowers users to take control of their digital collectibles and engage with the vibrant NFT ecosystem. By following the steps outlined in this guide, you can seamlessly import, manage, and showcase your NFTs while maintaining the highest levels of security. Embrace the world of NFTs and experience the future of digital ownership.